Pattern Review - Merchant & Mills, Trapeze Dress
Hey Everyone!
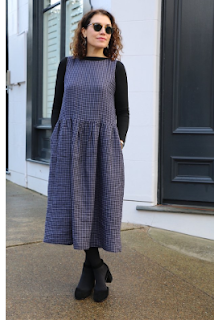
This week I bring you my latest vintage make, it's the Merchant & Mills Trapeze dress made from a vintage bed sheet I bought from Oxfam online.
 |
| Zeus wanted to be involved with this one! |
The pattern instructions were relatively easy to understand with illustrations of each step. However, I have to say I disagree with the method chosen to construct the dress. The all in one facing which covers the arm holes and the neckline, was near impossible to attach. It requests that you fully attach the neckline to the facing and then attach the armholes, this is all after you have sewn the side seams and centre back seam. Honestly, I still do not understand how this is supposed to work and all videos I found on YouTube were using a completely different method. In the end I decided to overlock the facing so it was only around the neckline and then use bias binding to finish the armholes. This method worked very well and was much simpler. In future I would recommend using Lisa Comfort's method and ignore the instructions altogether.
Also, I am not sure why the back is in 2 separate pieces as the dress just pulls on over your head without a zip or any fastenings in the back. I did attempt to pattern match them but next time I would just cut it on the fold.
Other than changing the facing I lopped off about 9 inches from the bottom of the dress as I am quite short (5ft 4") and it looked a bit silly on me at full length.
Also, I am not sure why the back is in 2 separate pieces as the dress just pulls on over your head without a zip or any fastenings in the back. I did attempt to pattern match them but next time I would just cut it on the fold.
 |
| Very happy with my pattern matching down CB |
Other than changing the facing I lopped off about 9 inches from the bottom of the dress as I am quite short (5ft 4") and it looked a bit silly on me at full length.
It came out as I expected and works well in the autumn layered over turtle necks. It's very comfortable and I find the shape flattering on my body shape - I have an hourglass figure. I would recommend this pattern to others and so long as you find an alternative way to fit the all in one facing it would be suitable for a beginner. Especially since there are no zips or pockets or any tricky features.

 |
| I'm wearing it over a Meghan Nielsen Rowan top - very versatile! |

Happy sewing!
Liz
Hi Liz, I’ve just finished this dress and it came huge so I will redo it about 2 sizes down. I got on with the instructions and would just like to say that the reason the back is in two parts is to enable the pulling through of the sides so it’s all neat and raw edges are hidden. Nice ta dah moment. Your dress looks great
ReplyDeleteI'm struggling with the interfacing too so I'm glad to read it's not just me and that you found a solution.
ReplyDeleteI don't understand Susan's comment about pulling it through though and I too will cut the back in one piece next time.
Hi. Had no problem at all with the facing instructions and I was brand new to sewing my own clothes when I made this. You need the back in two pieces so you can pull it through. If you don't recognise that instruction, I wonder if you're doing a different version of the dress or have read the wrong instructions? Also, cutting two back pieces is much more economical on fabric and allows for more adjustment if needed.
DeleteHello here is what I would do re facing. Cut the back on the fold, so not in two parts. Sew the facing to the neck. Leave the side seams open and use the Burrito Method to finish the arm holes (just google this) the sew up the side seams and hem.
Delete