My Latest Make - Self Drafted Tiered Skirt

I was struggling to find inspiration of what my next make
should be so I did what all sewists do and started sorting through my fabric
stash and browsing through pins on my ‘fashion inspiration’ Pinterest board. I
have a few makes which are just waiting to be sewn but I just didn’t have the
motivation to start until, inspiration struck!

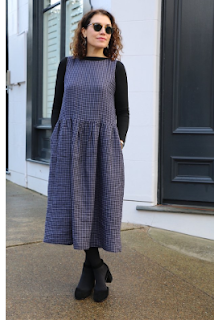
I had bought this red leopard print in the remnants section in Misan fabrics down Goldhawk Road at the end of last year and I remembered this image I’d seen of a Wear Lemonade skirt and I thought – yes! That’s what I want to make next!
I don’t actually know what this fabric is as it was just a
remnant but it’s definitely a knit which doesn’t fray and has a crinkled
texture which I thought went really well with this particular skirt design.


I had quite a few trial and error moments through this make beginning with the pattern drafting.
Firstly, I considered using a circle skirt for the top tier
and then adding rectangular ruffles. However, because I wanted an elasticated
waist which I would pull on over my hips it meant I had to calculate my circle
skirt based on my hip measurement. I did that using the By Hand London skirt calculator
but then the pattern piece was too wide for my fabric, so I had to try a
different method.
So, then I thought – why not use the Tilly and the Buttons Clemence skirt (you can see my previous version here) but rather than gather into a waistband I can use elastic! So, this
is what I did. I ended up with 3 pattern pieces – top tier (cut 2 on fold),
bottom tier (cut 2 on fold) and the middle tier (cut 2 on fold).

I proceeded to then prepare each tier by overlocking the edges and stitching them together to create circles which I could gather up. My next problem came when I went to topstitch the elastic in place. I like to do this because it prevents the elastic twisting during wear, and it evens out the gathers. However, the problem was that I had too much fabric to gather onto the elastic and I couldn’t stretch it flat to stitch it. Apparently when you gather into a waistband you can fit way more fabric than when you use an elastic waistband!

To fix this I had to halve all the tiers so that the smallest
tier was only as wide as my hips as opposed to double my hips. I lost a lot of
volume doing this, but I think that the frills make up for it. In hindsight I
think I should have shirred the waistband instead which may have allowed me
more volume, but I’ve never tried this before so I’m not sure how I would be
able to get the elastic to shrink down to my waist size. Something to investigate
next time.
 |
| So much gathering! |
Once I had finally gathered the waistband the rest was straight forward. I narrow hemmed the middle tier then folded over the top before gathering and topstitching onto the first tier then gathered the bottom tier and did the same before hemming. I’m really happy with the final result even if it’s not as voluminous as originally intended! This fabric is really stand out and can be dressed up or down and worn all year round. I love it with patent boots and tights during this cold spell we’re having.


Comments
Post a Comment